






photo home-34.png photo home-34.png photo home-34.png photo home-34.png photo home-34.png photo home-34.png photo home-34.png
Showing posts with label spicy. Show all posts

Tuesday, March 15, 2016

Thai Shrimp Ramen for 2


I'm keeping this 'Recipes for 2' train cruisin', and today I am sharing with you my spiced-up version of ramen. On a recent Costco run, we discovered these organic millet and brown rice ramen noodles and decided that we just had to try them out. I have been loving using red curry paste in recipes lately, so this time was no different. Today's ramen recipe is pad thai-coconut curry soup hybrid love child. Peanut butter and coconut milk make for a creamy base and the curry and paprika give it a real kick. Top it off with some chopped peanuts for a bit of a crunch and you are in business my friends! Perfect for date night in with your honey. 


Thai Shrimp Ramen

Ingredients:
  • 2 packages ramen (discard or keep seasoning packets for another use)
  • 2 tbsp. oil
  • 2 garlic cloves, minced
  • 1 red bell pepper, cored and thinly sliced
  • 1/2 medium onion, halved then thinly sliced
  • 2 tbsp. thai red curry paste
  • 1 tsp. paprika
  • 1/2 tsp. ground ginger
  • 1/2 can coconut milk
  • 2 cups broth
  • 2 tsp. sesame oil
  • 2 tbsp. coconut aminos (or soy sauce)
  • 1/4 cup creamy peanut butter
  • 1 lime, juiced
  • 1/2 lb. raw wild caught shrimp, peeled and deveined, chopped in half or thirds if extra large
  • chopped peanuts for garnish
  • chopped cilantro for garnish
In a large soup pot, heat the oil over medium heat. Add in the garlic, bell pepper, and onions. Saute until softened about 5 minutes. Add in the curry paste, paprika, and ginger. Stir to coat the veggies. In a small bowl, whisk together the peanut butter and half of the broth until well incorporated.

Increase heat to high and add in the coconut milk, broth mixture, remaining broth, sesame oil, coconut aminos, and lime juice. Bring the soup to a boil and then add in the ramen noodles. Cook for about 6 minutes before adding in the shrimp. 

Cook for another 2 minutes until the noodles are soft and the shrimp is cooked through. Serve hot and garnish with chopped peanuts and cilantro.


Saturday, January 16, 2016

Chorizo Queso Fundido with Salsa Verde


As you all know by now Superbowl season is about to be in full swing, and what screams football more than chips and dip? Here in Arizona, I have grown up a true Cardinals fan (no bandwagoner here), and win or lose, I always support my team. You know what else I'm an even bigger fan of than the Cardinals? Queso. But this ain't no ordinary queso, folks. No way. You think I wouldn't go all out for you this year? I've you got your dip needs covered my friends. Arizonans love their spicy foods. In every shape and form. So queso is no exception. 


This queso combines perfectly melted cheese, topped with greasy chorizo, then swirled with homemade salsa verde, which comes together in a cinch thanks to my Zyliss Easy Pull Food Processor. No dragging out my huge electric processor, cords and bowls askew. Nope, just toss everything into the easy pull and ta-da! Salsa verde just like that. I'm even giving one away to one of you lucky readers out there! To enter, simply go to my instagram page, follow me and comment with what you would make with the Zyliss Easy Pull Food Processor! Kapeesh?!


Salsa Verde
  • 1 lb. tomatillos, husks removed
  • 1/2 jalapeno
  • 2 garlic cloves
  • 1/4 onion
  • 1/2 cup cilantro
  • 1/2 lime, juiced
Chorizo
  • 1/2 lb. pork chorizo
  • 1/4 cup minced onion
  • 1/2 jalapeno, minced
  • 1/2 tsp. ground cumin
Queso
  • 1 cup heavy cream
  • 1 tbsp. flour
  • 2 oz. sharp cheddar cheese, shredded
  • 2 oz. white American cheese, shredded
  • 2 oz. colby jack cheese, shredded
  • pinch of freshly ground black pepper

Heat a cast iron skillet over high heat and cook the tomatillos, jalapeno, garlic, and onion for 4 minutes, until slightly charred. Add the roasted vegetables along with the cilantro and lime juice to your Zyliss easy pull food processor and pull about 20 times until smooth and well-blended.


Place the bowl of salsa in the fridge while your prep the rest of the dip.

In a large skillet, cook the chorizo over medium-high heat, breaking it up with a spoon as it cooks, then add the onion, jalapeno, and cumin. Continue to cook until the chorizo is cooked through. Remove from the heat.

In a medium sauce pot, heat the cream and flour until just simmering. Add in the cheese and whisk until the cheese melts completely and sauce becomes silky smooth. Add the pepper and whisk to combine.

Pour the queso in a serving dish. Add the chorizo to the center of the queso, then swirl the salsa verde around the outside. Serve hot with chips. 


**I was provided with 2 Zyliss Easy Pull Food Processors for this post. All recipes and opinions are my own. Contest ends Monday,  January 18, 2016 at Midnight ET. 

Tuesday, December 1, 2015

Sausage & Pepper Calzone


I tried my hand at my first ever calzone, and I have to say that it was an instant hit in our house. It's no secret that my fiance loves all things food, especially pizza. So what's even better than pizza? Stuffed pizza! I took the traditional sausage and peppers combo and filled a pizza dough ball full of it, baked it, and served it with some homemade marinara sauce. It was perfectly cheesy, yet crispy at the same time, and made for excellent leftovers the next day. If you're looking for something hearty to serve on a cold night, bundle up and make this calzone for yourself. 


Sausage & Pepper Calzone

Ingredients:
  • 1 ball pizza dough
  • 2 cups shredded mozzarella cheese
  • 2/3 lb. hot Italian turkey sausage
  • 1/2 yellow bell pepper, diced
  • 1/2 red bell pepper, diced
  • 1/2 white onion, diced
  • 1 egg, whisked
  • 1 tbsp. pizza seasoning
  • marinara sauce for dipping
Preheat oven to 400 degrees F. 

Heat a large sauce pan over medium-high heat and cook the sausage, breaking it up with a spoon, until no pink remains. Add the cooked sausage to a bowl, and place the pan back over the heat. Cook the onions and peppers in the oil left in the pan from the sausage. Cook for 6-8 minutes until softened.

Roll out pizza dough to create a 12x6-inch rectangle. Place onto a non-stick baking sheet. Sprinkle 1/2 of the shredded cheese down the middle, then add the sausage and peppers on top. Top with the remaining cheese.


Fold one side of the rectangle over to cover half of the filling. Brush the whisked egg onto the folded side, and then fold the remaining side on top to close the calzone. 


Brush more whisked egg on the top and sprinkle with pizza seasoning. Bake in the oven for 45 minutes until the crust is golden brown and the cheese in melted and bubbly. Remove from the oven and allow to cool for 5 minute before slicing and serving. 

Tuesday, November 24, 2015

Bahn Mi Burger


Who needs a break from Thanksgiving recipes? Raise your hand. Any hands raised? I know mine aren't, but I assume that your pinterest is flooded with turkey tips, side dishes, pies, and more, so why not mix it up a little just before the big day! We all need to eat in preparation for the "big meal", so I chose something hearty like this burger. I recently made these burgers for Andrew since I know what a huge fan he is of the classic Bahn Mi flavor, but I wanted to give it a little twist (surprised, aren't you? Sense the sarcasm here). I took the traditional carrot, cucumber, and cilantro toppings and placed them atop a juicy burger, complete with Sriracha mayo, because what Bahn Mi is complete without a big old spoonful of that deliciousness?  


Bahn Mi Burger

Ingredients:
Makes 4 Burgers
  • 2 lbs. 85/15 ground beef
  • 1 tsp. chili powder
  • 1/2 tsp. mustard powder
  • 1/2 tsp. garlic powder
  • 1 tsp. salt
  • 1/4 tsp. freshly ground black pepper
  • 4 burger buns, split
  • 1 cup shredded carrots
  • 1 tbsp. sugar
  • 2 tbsp. white vinegar
  • 1/2 cucumber, thinly sliced
  • 1 bunch fresh cilantro
  • 1/2 cup mayonnaise
  • 1-2 tbsp. Sriracha hot sauce
In a small bowl, sprinkle the sugar and pour the vinegar over the shredded carrots. Place in the fridge. In another small bowl, whisk together the mayo and Sriracha and place in the fridge.

Preheat grill to medium-high heat, and in a medium bowl, mix together the beef, chili powder, mustard powder, garlic powder, salt and pepper. Form the beef mixture into 4 large burger patties. Cook the patties, for 4 minutes on each side, for medium. During the last minute of grilling, place the buns, cut-side down on the flameless side of the grill, just to get a little crisp.

Slather the prepared Sriracha mayo on one half of all of the buns. Place the burger patties on top, then garnish with the carrots, cucumbers, and fresh cilantro. Serve hot.

Monday, September 28, 2015

Traditional Chicken Enchiladas


This weekend was one for the books. So much so, that I barely took any photos, just the memories to remember it by. I celebrated 3 years since I met Andrew, with dinner at the exact place we met, dined on pozole matzah ball soup (like, what?!), lamb, and pumpkin cheesecake. I met up with my best guy friend from college whom I hadn't seen in over a year. Celebrated one of my bridesmaid's birthday with a grown up pizza party and cocktails. Went new car shopping (uh oh), and even ordered our wedding rings! Yes! See, weekend for the books. Since the weekend was filled with so much love, I wanted to share with you Andrew's second love (behind me, of course), enchiladas. He always requests my spicy chicken avocado enchis, but this time I wanted to go a little more traditional. 


Traditional Chicken Enchiladas

Ingredients:
  • 2 chicken breasts, cooked, then shredded (or can use a rotisserie chicken if short on time)
  • 1 tbsp. olive oil
  • 1 cup diced white onion
  • 2 garlic cloves, minced
  • 1/4 cup freshly chopped cilantro
  • 1 tsp. ground cumin
  • 1 tsp. chili powder
  • 1/3 cup chicken broth
  • 3/4 cup diced tomatoes
  • 8 8-inch tortillas
  • 2 cups red enchilada sauce
Garnish:
  • crumbled cotija cheese
  • freshly chopped cilantro
  • serrano pepper, sliced

Preheat oven to 350 degrees F.

In a large skillet heat the oil over medium-high heat. Add in the onion, garlic, cilantro, cumin, chili powder. Cook until the onions begin to soften, about 7 minutes. 

Add in the chicken, broth, and diced tomatoes. Simmer until the liquid reduces, another 8-10 minutes. Pour 1 cup of sauce into the bottom of a 9x13-inch dish. Dip both sides of each of the tortillas in the sauce, then fill each one with the chicken filling down the center. Roll up and place into the baking dish. Repeat with the remaining filling and tortillas.

Pour the rest of the sauce over the top of the enchiladas and bake for 15 minutes. Remove from the heat and garnish with cotija, cilantro, and sliced peppers. 

Wednesday, September 23, 2015

Enchilada Stuffed Poblano Peppers

Is there anything more beautiful than a perfect poblano pepper? I seem to be drawn to them anytime I am at the farmer's market, especially when they are ripe, crisp, and a beautiful bright, yet deep green color at the same time. I have been known to roast my poblanos many a time {see here, here, and here}, but this time I decided to boil them, just until softened slightly, and then fill them with some classic Mexican flavors. This is my south of the border version of stuffed bell peppers. Plus, the saltiness from the cotija cheese brightens up all of the flavors. This recipe is my new go-to weeknight dinner with easy ingredients, easy prep, and a delicious result. 


Enchilada Stuffed Poblano Peppers

Ingredients:
  • 4 whole fresh poblano peppers
  • 1 tbsp. oil
  • 1 medium zucchini, chopped
  • 1 garlic clove, minced
  • 1/2 jalapeno, minced
  • 3 green onions, sliced
  • 1 1/2 cups cooked chicken breast, chopped
  • 1 cup wild rice, cooked according to directions
  • 1 can Mexicorn (corn, pepper mix)
  • salt and pepper to taste
  • 1 cup enchilada sauce
  • cotija cheese, crumbled for garnish
Bring 2 inches of water to a boil in large pot or a high-sided skillet. Boil the peppers for 6 minutes on each side, until softened.

Meanwhile, heat the oil over medium- high heat and add in the zucchini, garlic, jalapeno, and onions. Saute for 5 minutes, stirring occasionally.  Add in the cooked chicken, rice, and can of Mexicorn, stir to combine. Cook, stirring occasionally, until the peppers are done.

Remove the peppers from the pot, and turn off the heat for the filling. Carefully cut a slit down the center of each pepper, but do not cut all the way through, we just want to create a pocket to put our filling in. Scoop out the seeds from each pepper using a spoon, *careful* for steam may burn hands. 

Once the insides of the poblanos are cleaned out, fill each pepper with the chicken and rice filling. Top with warmed enchilada sauce and garnish with cotija.

Wednesday, September 9, 2015

Green Chili Pork Stew


Remember a few weeks ago when I attended the Macayo's Mexican Grill & Cantina dinner, and wrote about it on AZFoodie? Well I forgot to mention that after stuffing our faces with delicious dish after dish, we left with a goodie bag, complete with a can of Macayo's own Green Chile Enchilada Sauce, as well as the recipe for their infamous Green Chile Pork Stew. After making this at home, I decided that it couldn't be a secret anymore and that I had to share it with you all! The pork cooks down in a sweet and spicy green sauce until fork tender, making this the perfect meal to eat as it, or get uber creative and put it in burritos, serve over rice, or even make a breakfast out of it! I would love to see how you make this your own meal. Be sure to tag me on instagram at @hotdogfoodblog with the hashtag #hdfb. 


Green Chili Pork Stew

Ingredients:
  • 2 lb. pork shoulder (boneless), cut into 1/2-inch chunks
  • 1 tbsp. high heat oil, such as Avocado Oil
  • 1 tsp. salt
  • 1/2 tsp. pepper
  • 1 tsp. cumin
  • pinch of red pepper flakes
  • 1/2 red onion, chopped
  • 2 garlic cloves, minced
  • 2 poblano chiles**
  • 1 16.-oz. can Macayo's Green Chile Enchilada Sauce (found in the Mexican food aisle)
  • 4 oz. salsa verde
  • cabbage, cilantro, onion for garnish (optional)
  • tortilla chips for serving

**Roast the chiles over high heat on the grill, or under your broiler in your oven, until all sides are charred and black. Remove from heat and place into a ziplock bag to steam. This will make it easy to remove the skins. After resting for 20 minutes, remove from the bag and peel off the charred skin. Remove the stem and the seeds, then chop the peppers. This can be done up to 2 days in advance.

In a large pot, heat the oil over medium-high heat. Add in the onion and cook for 5 minutes until beginning to soften. Add in the garlic and cook for another 30 seconds. 

Season the pork pieces with salt and pepper all over. Add the pork to the pot and cook, browning on all sides. Add in the cumin and red pepper flakes, continue to cook for another 3 minutes, until no pink remains.

Next, add in the green chile enchilada sauce, salsa verde, and chopped poblanos. Stir to combine, then cover and lower heat to a low simmer. Cook until the pork is cooked through and the flavors have combined, at least 45 minutes, and up to 2 hours. The longer it cooks, the more intense the flavors will get.


Garnish with sliced cabbage, chopped onion and cilantro. Serve hot with tortilla chips.

*This post was not sponsored by Macayo's, and all opinions are my own. 

Thursday, September 3, 2015

Blackened Ahi Tuna Sliders with Wasabi Aioli


Okay, so I am totally behind the times, but we just started watching "Sons of Anarchy" on Netflix, and all hail the great land of TV production, is that show good, or what? No spoilers please, I'm only on the 2nd season, but we have been binge watching like 3 to 4 episodes a night before bed. Or half of a season on Sunday morning, whoops! I think my dreams have been taken over by biker gang plots, and I'm cool with it. But that's besides the point. The point today is to introduce you to these blackened tuna sliders. It's basic common knowledge that anything you put on a hawaiian roll is going to be delicious. But add some smoky, spicy blackening seasoning, and forget about it! 

Blackened Ahi Tuna Sliders with Wasabi Aioli

Sliders:
  • 1 lb. sushi grade ahi tuna, cut into 2-inch steaks
  •  1/2 cup gluten-free tamari or soy sauce
  • 1 tsp. paprika
  • 1 tsp. salt
  • 1/4 tsp. black pepper
  • 1/2 tsp. garlic powder
  • 1/2 tsp. onion powder
  • 1 tsp. cayenne or ground red pepper
  • 1 tsp. thyme leaves
  • 1 tsp. dried oregano
  • 1 tbsp. high heat oil such as avocado oil
  • 1/2 cucumber, peeled and thinly sliced
  • 1/2 avocado, sliced
  • 5 slider buns (I used King's Hawaiian rolls)
Wasabi Aioli
  • 2 tbsp. wasabi paste
  • 1/2 avocado
  • 1 tsp. mayo
  • 1/2 lime, juiced 
In a food processor, blend the wasabi paste, avocado, mayo, and lime juice until well incorporated and smooth. Place into the fridge until ready to serve.

Place the tuna into a shallow dish and pour the tamari over the top. Place into the fridge and allow to marinate for about 10 minutes. Meanwhile, prepare the blackening seasoning by whisking together the paprika, salt, pepper, garlic powder, onion powder, cayenne, thyme, and oregano together in a shallow dish.

Once the tuna has marinated, remove from the fridge and coat all sides of the tuna steaks in the blackening seasoning. Heat the oil over medium-high heat in a large skillet.

Once the oil is hot, cook the tuna steaks for 30 seconds on each side (for rare, longer if necessary), then promptly remove from the heat as not to overcook them.

To serve, spread the wasabi aioli onto the bottoms of the slider buns. Top with the tuna steaks, then cucumber slices and avocado.

Thursday, August 20, 2015

Bahn Mi Ramen


Hi, my name is Rhea and I am a bahn mi addict {everybody in unison: Hi Rhea}. It's true. Don't believe me, check out my recent posts about bahn mi sandwiches and bahn mi hot dogs. There's just something about those pickled carrots and crunchy cucumbers that suck me in every time. Now, I've gone on to create bahn mi ramen bowls, complete with crispy shredded pork and topped with all of the toppings. So many that you can't even see the noodles nestled underneath of them. Not sorry about it one bit. 


You know what else I'm not sorry about? My 3-day weekend hiatus that I am about to embark on. I'm leaving the Arizona sun for the California coast, for none other than my bachelorette weekend. Technically our wedding isn't for another 6 months, but finding a weekend for 11 girls to get away proved to be a difficult task, and this one just worked, so we're rolling with it. ut if you don't find yourself at a bachelorette party this weekend, the next best thing to do is to make this ramen. Trust me.

Bahn Mi Ramen

Ingredients:
  • 4 packages ramen, flavor packets saved for another use
  • 2 cups shredded pork (I used leftovers from this recipe)
  • 1 tsp. sesame oil
  • 2 tbsp. tamari (can substitute soy sauce)
  • 2 tbsp. brown sugar
  • 2 tbsp. rice vinegar
Pickled Carrots:
  • 1 large carrot, peeled with vegetable peeler
  • 1/2 cup vinegar
  • 1 tbsp. sugar
    Garnish:
    • thinly sliced cucumber
    • chopped green onions
    • 1 small avocado, thinly sliced
    • 4 soft-boiled eggs**
    • fresh cilantro

    Prepare the pickled carrots at least 4 hours before, or even the night before. Simply toss the peeled carrots with the sugar and vinegar, and place in the fridge for 4 hours or so.

    Bring a large pot of water to a boil and cook the ramen noodles for about 5 minutes until softened, but not mushy.

    Meanwhile, heat the sesame oil in a large skillet over medium-high heat and add the shredded pork to the hot oil. Add in the tamari, rice vinegar, and sprinkle with the brown sugar. Continue to cook, stirring occasionally until the pork is crispy and aromatic.

    Once the ramen is cooked and the pork is crispy, fill 4 bowls with the ramen and top with the pork. garnish with the pickled carrots, cucumber, green onions, avocado, cilantro and a soft-boiled egg.


    **To soft-boil the eggs, simply bring a medium pot of water to a boil. Reduce to a rolling simmer and add in the eggs. Cook for 5 minutes. Remove the eggs from the heat and add to a bowl of ice water and allow to cool for 1 minute. Carefully place the eggs on a dish towel and crack the shell with the back of a spoon. Gently peel off the shell, and serve immediately.

    Wednesday, May 27, 2015

    Pineapple Sriracha BBQ Sauce


    With Memorial Day weekend behind us, we are full-fledged into the summer season. For me, this means going from my air-conditioned house, to my air-conditioned car, to my air-conditioned office, and back again.  These 100+ temps in AZ are no joke, so we do what we can to battle the heat. One place I do not avoid heat is in my kitchen. I love ordering pad thai from our favorite take-out restaurant, because they always ask us what heat index we want, and for Andrew it's around the 3 range (sorry for the call out!) , and for me it's a 9-10, every time. I've probably burnt my taste buds at this point, and that's why I just keep spicing everything up, because I need to feel the heat. But I don't care. That's why I made this BBQ sauce. It's hot, but the pineapple cools down the palate. Making it consumable by both 3 and 10 lovers on the heat scale.

    Pineapple Sriracha BBQ Sauce

    Ingredients:
    • 1/2 tbsp. coconut oil
    • 2 garlic cloves
    • 1 cup pineapple chunks
    • 1 cup bbq sauce
    • 1 tbsp. sriracha
    • 1 lime, juiced
    Add the coconut oil to a medium saucepan over medium-high heat. Add in the chopped pineapple and garlic. Cook until the garlic is fragrant, about 2 minutes. Add in the bbq sauce, sriracha, and lime juice, reduce heat to low and simmer for about 10 minutes, stirring occasionally.

    Carefully pour the mixture into a blender or food processor. Caution: mixture will be hot so handle with care! Blend until smooth, and keep in an airtight container for up 1 week. Use it as a marinade or dipping sauce. Grilled chicken, burgers, and onion rings come to mind first!

    Tuesday, May 26, 2015

    Individual Quinoa Enchilada Egg Bake


    Today is an exciting day, as I have teamed up with Diana, the creator of Arizona Foodie to share a recipe with both established and new followers alike. I was extremely excited to create a recipe for Diana, and I had the perfect one in mind. These individual enchilada quinoa bowls are topped with baked eggs and a heaping serving of avocado, both filling, yet easy on the waistline. Be sure to follow AZFoodie on instagram as Diana's goal is share her passion for food and sinful dishes across Arizona.

    Click here to see the recipe.


    Monday, May 4, 2015

    Roasted Garlic Salsa


    If you've been living under a rock, then I'm here to tell you that Cinco de Mayo is tomorrow!! A day full of tacos, margaritas, and most of all, SALSA! What better way to celebrate than to make a large batch of homemade salsa. Whether it's for a group, or just you at home in your pajamas eating take-out with you fiance and shoveling large chip-fuls of this salsa into your mouth (no, definitely not talking about myself), this salsa is sure to please the palate. The roasted garlic makes this salsa a bit sweet, evening out the heat from the jalapeno. Best of both worlds. Just be sure to have plenty of chips on hand!


    Roasted Garlic Salsa

    Ingredients:
    • 1 head garlic
    • 1 tbsp. olive oil
    • 3 medium tomatoes, seeds discarded, then finely diced
    • 1/2 red onion, finely chopped
    • 1 jalapeno, minced (remove seeds and ribs for less heat)
    • 1/2 cup fresh cilantro leaves, finely chopped
    • 1/2 tsp. oregano
    • 3/4 tsp. cumin
    • salt and pepper to taste
    Preheat oven to 325 degrees F. Cut the top 1/4-inch or so off of the head of garlic, exposing the cloves. Place the garlic into a piece of tin foil, drizzle with olive oil and salt, then wrap lossely in the tin foil, sealing the edges. Bake in the oven for about 45 minutes, until the garlic is roasted and golden brown. Remove and let cool to touch,

    Meanwhile, Add the chopped tomato, onion, jalapeno, cilantro, oregano, and cumin into a bowl and toss to mix season with salt and pepper. 

    Once the garlic is cooled to the touch, squeeze the roasted garlic cloves out of the skin and chop them. Add the chopped roasted garlic to the salsa and season with salt and pepper. Chill in the fridge for at least an hour before serving.


    Plus, how cute is this margarita chip and dip bowl. I'd say I got the winning gift at the white elephant gift exchange last year!

    Friday, April 17, 2015

    Spicy Chicken Avocado Enchiladas: Take 2


    I love his blog for so many different reasons. It motivates me to cook and try new things on a constant basis. It pushed me outside of my comfort zone. It allows me to go back and see what my life was like at different times. Like my own very-public online diary. It feeds my soul. Andrew consistently tells me that one of my favorite dishes I ever made him was my Spicy Chicken and Avocado Enchiladas. To put this in perspective, I originally posted about this dish in July of 2012. Almost 3 years later and he is still talking about them. I pulled up the recipe recently and took a look at my original post. Awful grainy photos filled the page, and I just knew I had to re-make these. Both to please Andrew and his cravings for these enchiladas, and to do the recipe some justice with some updated photography. Not that I am a professional in any means. But anything better than a 2011 cell phone picture at night will do. So without further ado, I present to you the new and improved Spicy Chicken and Avocado Enchiladas: Take 2.


    Spicy Chicken Avocado Enchiladas

    White Enchilada Sauce:
    • 1/2 tbsp. unsalted butter
    • 1 jalapeno pepper, minced (remove seeds for less heat)
    • 1 garlic clove, minced
    • 1/2 tbsp. flour
    • 1/2 cup chicken or vegetable stock
    • 1/2 tsp. ground cumin
    • pinch of salt and pepper
    • 2 tbsp. fresh cilantro, chopped, plus more for garnish
    • 1/2 cup chopped green chiles
    • 1/4 cup sour cream or plain greek yogurt
    Enchilada Filling:
    • 2 chicken breasts, cooked and chopped or shredded
    • 1 cup shredded white or mexican cheese, separated
    • 1/2 onion, finely chopped
    • 1 large avocado, seeded and chopped
    • 8 flour tortillas

    Preheat oven to 375 degrees. Spray a casserole dish with non-stick cooking spray and set aside.
    Melt butter in a medium pot over medium heat. Once the butter is melted, saute the jalapeno and garlic for about 1 minute. Whisk in flour and continue to stir for 2 minutes.

    Slowly whisk in the broth in a steady stream. Add in the cumin, salt, and pepper. Bring to a simmer and add in the cilantro, green chiles, and sour cream or yogurt. Remove the sauce from the heat.

    Add 1/2 cup opf the enchilada sauce to the bottom of the prepared casserole dish. In a large bowl, mix together the chicken, onion, avocado, and 1/2 of the cheese. Place about 1/2 cup of the chicken mixture in the center of each tortillas. Roll up the tortillas and place seam-side down in the casserole dish.

    Top with the remaining sauce and the rest of the cheese. Bake in the oven for 15-20 minutes until heated through and the cheese is melted and bubbly. Serve hot with cilantro as garnish.

    Friday, April 10, 2015

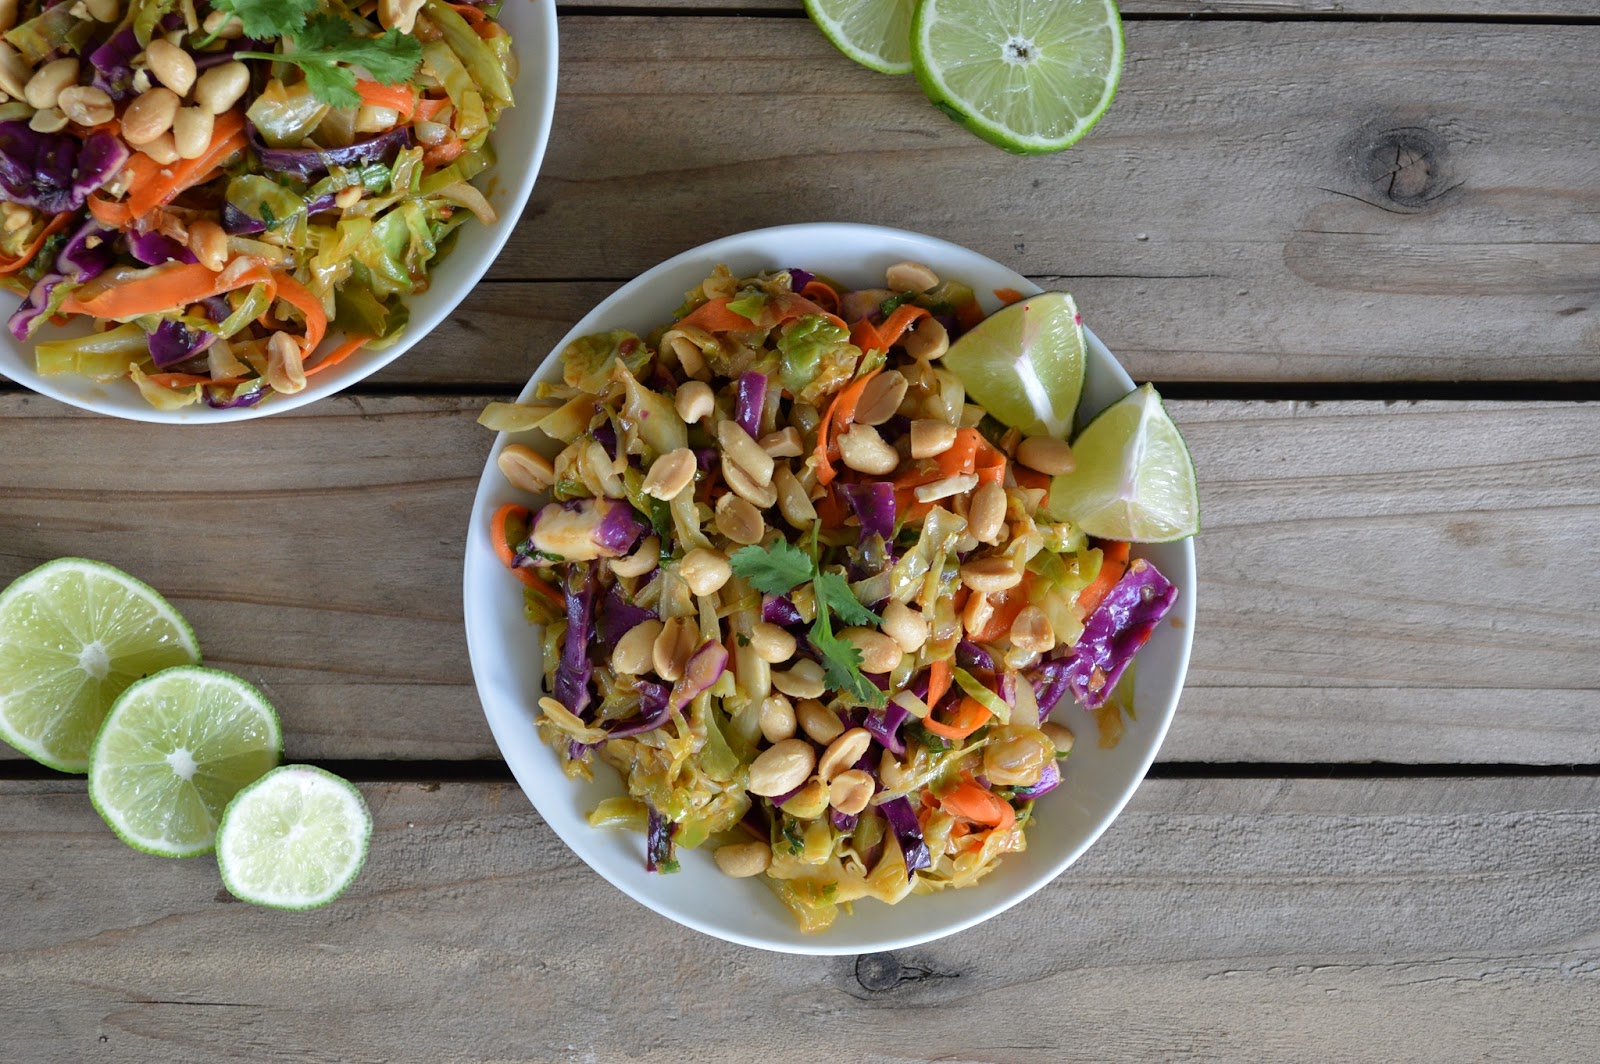
    Lightened Up Pad Thai Cabbage Stir Fry


    I'm never one to durn down a bowl of pasta, let alone a heaping serving of pad thai. But with my upcoming wedding come lots of parties and I plan on looking my best. So instead of noodles I tried my hand at replacing them with sliced cabbage. Now I am in no way stating that cabbage is better than pasta. It's just better for my waist line. This lightened up version of pad thai is perfect for bikini season and you can feel like you are indulging without the guilt. You can even add some grilled chicken into the mix if you like! Best part is, this makes a huge batch and it is delicious both hot and cold. So make it fresh and piping hot for dinner one night, then have it cold for lunch the next day. Win-win!


    Lightened Up Pad Thai Cabbage Stir Fry

    Ingredients:
    • 2 tbsp. olive oil
    • 1 head green cabbage, thinly sliced
    • 1 cup shredded brussels sprouts (optional)
    • 2 large carrots, peeled with a vegetable peeler
    • 1/2 red cabbage, chopped
    • 2 tbsp. fresh cilantro, chopped
    • 3/4 cup edamame beans
    • 1/2 cup chopped peanuts
    • 1 lime, quartered
    Pad Thai Sauce
    • 1 lime, juiced
    • 4 tbsp. soy sauce (coconut aminos for soy/gluten-free)
    • 3 tbsp. sriracha hot sauce
    • 1 tsp. sesame oil
    • 3 tbsp. chili sauce
    • 3 tbsp. peanut butter
    Heat the olive oil in large skillet or cast iron pan over medium-high heat. Add in the sliced cabbage and brussels (is using). Season with salt and pepper and cook until tender, about 8-10 minutes.

    Meanwhile, in a large bowl, toss together the carrots, red cabbage, cilantro, and edamame. Set aside.

    In a medium bowl, whisk together all of the pad thai sauce ingredients and add to the cooked cabbage "noodles". Cook for another 2 minutes, tossing to cover the cabbage in the sauce. Then pour the hot ingredients into the large bowl with the rest of the vegetables. Toss well and add chicken if using.

    Plate onto bowl or medium sized plates and garnish with chopped peanuts and lime quarters. Serve warm.


    design + created by strawberriesnwine.com | 2014