photo home-34.png photo home-34.png photo home-34.png photo home-34.png photo home-34.png photo home-34.png photo home-34.png
Showing posts with label fish. Show all posts

Wednesday, June 22, 2016

Ahi Tuna Lettuce Cups


Summer. Oh how I anxiously await yuor arrival, and then the moment you appear, how I despise you. As an Arizona native, you would think that I have grown accustomed to the 115+ degree summers here. Fun fact, I have not. While I agree to accept it (because let's face it, Arizona rocks), I will never "get used" to burning myself on my seatbelt, not being able to walk outside in my bare feet, or check the mail without blistering my poor fingertips. With being said, I have been finding it rather hard to get inspired in the kitchen, because, well, everything is so damn hot. And not in the deliciously spicy kinda way. I have found some great non-oven, non-grill recipes for the summer, and this is one of them. Lightly seared ahi tuna, just a couple of minutes on the stove, and all fresh, crisp toppings make for a perfect summer meal, complete with a kick-ass wasabi vinaigrette on top. So what are you waiting for? Hike up the a/c and get to cookin'!


Ahi Tuna Lettuce Cups

Ingredients:
  • 1 lb. sushi grade ahi tuna
  • 2 tbsp. olive oil
  • 2 tbsp. toasted sesame seeds
  • salt and pepper to taste
  • 10 butter lettuce cups
  • 1 large carrot, cut into matchsticks
  • 1/2 cucumber, halved then sliced
  • 1 avocado, pitted and thinly sliced
  • 1/3 cup shelled edamame
  • 1 green onion, sliced
  • 1/2 cup chopped cashews
Wasabi Vinaigrette:
  • 1 tsp. wasabi paste
  • 1 tbsp. soy sauce
  • 2 tbsp. white wine vinegar
  • 1 tsp. grated fresh ginger
  • 1 tbsp. oil

In a medium bowl, whisk together the vinaigrette ingredients and place in the fridge until the lettuce cups are ready to be served.

Heat 1 tbsp. olive oil in a non-stick skillet over medium-high. Rub the other tbsp. of oil on both of the sides of the tuna, then season with salt and pepper. Press the sesame seeds firmly onto both sides of the tuna. Sear the tuna on one side for 2 minutes before flipping to the other side for another 2 minutes. Remove from the heat and allow to rest for a couple of minutes before slicing.

To prepare the cups, place some sliced carrots, cucumber, and avocado into each lettuce leaf. Top with a slice of tuna, some edamame, green onion sliced, and chopped cashews. Serve with the wasabi vinaigrette. 

Thursday, June 16, 2016

Easy Shrimp & Sausage Paella


With Father's Day coming up, I have decided that this dish is my father as a dinner entree. He's totally the guy that grabs every thing out of the fridge and makes something (usually) wonderful out of it. I can't say that his peanut-butter-turkey-pickle-mustard sandwich was on my top faves, but he can make a mean skillet! So here's to you Cowboy Dave, you kitchen rebel, you!


As a first-time paella maker, I've got to say that this is such a fun and easy dish to whip up for dinner. Not to mention all of the colors! I'm not always a huge rice fan (I''m more of a mashed potatoes girl myself), but the rice mixed in with all of the spicy flavors and textures going on in this paella is a definite winner. I used some mango jalapeno chicken sausages in this version, but feel free to use chorizo, or any sausage really. Mixing it up is half of the fun! Plus, you can make this serve just enough for 2 people, or triple the batch to feed a whole crew. Feel free to omit the hot sauce to make it kid-friendly, but I honestly think the hotter the better!


Easy Shrimp & Sausage Paella

Ingredients:
  • 1 small onion, chopped
  • 3 garlic cloves, minced
  • salt and pepper to taste
  • 2 tbsp. extra virgin olive oil
  • 1 tbsp. butter
  • 1 cup arborio rice
  • 1 14-oz. can diced tomatoes
  • 2 1/2 cups chicken or vegetable broth
  • 1 tbsp. paprika
  • 1 tsp. hot sauce
  • 2 chorizo sausages, sliced
  • 1 lb. peeled and deveined shrimp
  • 1 cup frozen peas
  • 1 tbsp. green onions, sliced
In a large saute pan or cast iron skillet, heat olive oil over medium-high heat. Add in the onion and garlic and saute until softened and fragrant, about 5-7 minutes. Add in the butter and allow to melt slightly before adding in the paprika and the rice. 

Toss the rice in the onion mixture to coat, then add in the hot sauce, tomatoes, and broth. Bring to a slight boil and cook , stirring occasionally until the rice has softened and most of the liquid has evaporated, about 15 minutes.

Now toss in the sliced sausages, the raw shrimp, and the frozen peas. Allow the shrimp to cook and turn pink and the peas to heat up before topping with green onions and serving hot in shallow bowls.  

Friday, March 25, 2016

Honey Mustard Baked Salmon


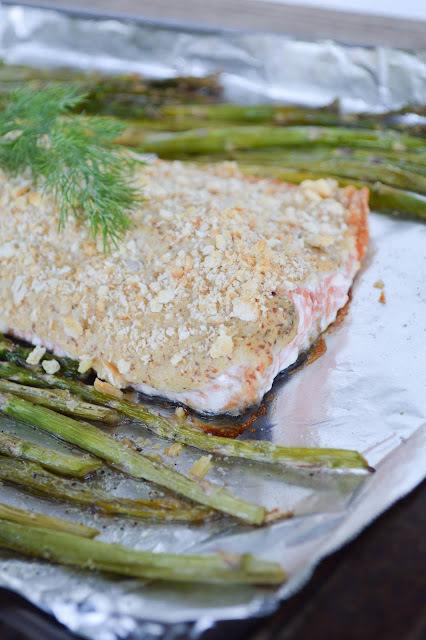
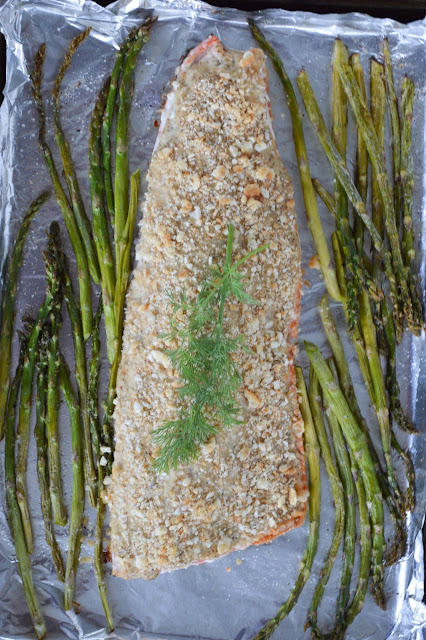
Have I mentioned this week that I love Easter? Yes, I know, we've already established that I am a sinner when it comes to refusing to eat Easter ham, but what about all of the other yummy Easter foods that I love? Deviled eggs, carrot cake, and fresh vegetable quiche just to name a few. Another favorite of mine is a freshly baked filet of salmon. The tanginess of the whole grain mustard sauce and the buttery crunchy topping is just about as damn good as it gets. Plus, crispy roasted asparagus is a side-ass side kick. Happy Easter all! Hope your wine glasses are as full as your baskets.


Honey Mustard Baked Salmon

Ingredients:

  • 1 lb. salmon filet, skin on
  • 2 tsp. honey
  • 3 tbsp. whole grain mustard
  • 2 tbsp. sour cream
  • 1 tsp. fresh dill, minced
  • 8 butter crackers (such as Ritz)
  • 1 lc. fresh asparagus, ends trimmed
  • 1 tbsp. olive oil
  • salt and pepper to taste

Preheat oven to 450 degrees F. Line a baking sheet with tin foil. Toss the asparagus with olive oil, salt, and pepper. Bake in the oven for 5 minutes. 

Meanwhile, whisk together the honey, mustard, sour cream, and dill. Remove the baking sheet from the oven and lower heat to 400 degrees F.

Carefully place the salmon in the middle of the baking sheet, skin-side down and spread the top of the salmon with mustard sauce. Top with the crumbled crackers and bake in the oven for 12-15 minutes until just cooked through. 

Serve warm with roasted asparagus on the side. 

Monday, March 7, 2016

Shrimp, Potato & Bacon Chowder


I just had to make one last soup recipe before the weather gets too hot here in the southwest. Being in a landlocked state, I'm always a little hesitant about purchasing seafood at the supermarket (read: farm-raised crap), but I found wild caught Mexican shrimp at my local farmers market last week and knew it needed to make its way into a hearty soup. This soup. Creamy potatoes, fresh chopped shrimp, and crispy bacon all play a great role in this dinner/leftovers for lunch the next day. Feel free to use any type of potatoes you like, new potatoes, red potatoes, and russet are all great options!


Shrimp, Potato & Bacon Chowder

Ingredients:
  • 2 slices bacon, chopped
  • 1 small onion, chopped
  • 1 lb. russet potatoes, peeled and chopped
  • 2 cups chicken broth
  • 1 1/2 cup half & half
  • 1/2 cup dry white wine
  • 1 tsp. sea salt
  • 1/4 tsp freshly ground black pepper
  • 1/2 lb. wild caught raw shrimp, peeled and cut into 1-inch chunks
  • 2 tsp. hot sauce
  • 1 green onion, sliced
In a large pot, cook the bacon over medium-high heat until browned. Remove the bacon with a slitted spoon and place onto a paper towel to drain. Place the pot back onto the stove and cook the onions in the bacon grease.

Once the onions have softened slightly, about 3 minutes, add in the potatoes, broth, half & half, wine, salt, and pepper. Stir to combine and bring to a boil.

Lower the heat to a low simmer and cook until the potatoes are tender, about 25-30 minutes. Stir occasionally. 

Once the potatoes are soft, add in the hot sauce and the shrimp and cook for another 3-5 minutes until the shrimp is cooked and heated through.

Serve hot, garnish with green onions and bacon. 

Thursday, September 3, 2015

Blackened Ahi Tuna Sliders with Wasabi Aioli


Okay, so I am totally behind the times, but we just started watching "Sons of Anarchy" on Netflix, and all hail the great land of TV production, is that show good, or what? No spoilers please, I'm only on the 2nd season, but we have been binge watching like 3 to 4 episodes a night before bed. Or half of a season on Sunday morning, whoops! I think my dreams have been taken over by biker gang plots, and I'm cool with it. But that's besides the point. The point today is to introduce you to these blackened tuna sliders. It's basic common knowledge that anything you put on a hawaiian roll is going to be delicious. But add some smoky, spicy blackening seasoning, and forget about it! 

Blackened Ahi Tuna Sliders with Wasabi Aioli

Sliders:
  • 1 lb. sushi grade ahi tuna, cut into 2-inch steaks
  •  1/2 cup gluten-free tamari or soy sauce
  • 1 tsp. paprika
  • 1 tsp. salt
  • 1/4 tsp. black pepper
  • 1/2 tsp. garlic powder
  • 1/2 tsp. onion powder
  • 1 tsp. cayenne or ground red pepper
  • 1 tsp. thyme leaves
  • 1 tsp. dried oregano
  • 1 tbsp. high heat oil such as avocado oil
  • 1/2 cucumber, peeled and thinly sliced
  • 1/2 avocado, sliced
  • 5 slider buns (I used King's Hawaiian rolls)
Wasabi Aioli
  • 2 tbsp. wasabi paste
  • 1/2 avocado
  • 1 tsp. mayo
  • 1/2 lime, juiced 
In a food processor, blend the wasabi paste, avocado, mayo, and lime juice until well incorporated and smooth. Place into the fridge until ready to serve.

Place the tuna into a shallow dish and pour the tamari over the top. Place into the fridge and allow to marinate for about 10 minutes. Meanwhile, prepare the blackening seasoning by whisking together the paprika, salt, pepper, garlic powder, onion powder, cayenne, thyme, and oregano together in a shallow dish.

Once the tuna has marinated, remove from the fridge and coat all sides of the tuna steaks in the blackening seasoning. Heat the oil over medium-high heat in a large skillet.

Once the oil is hot, cook the tuna steaks for 30 seconds on each side (for rare, longer if necessary), then promptly remove from the heat as not to overcook them.

To serve, spread the wasabi aioli onto the bottoms of the slider buns. Top with the tuna steaks, then cucumber slices and avocado.

Tuesday, August 11, 2015

Ahi Tuna Cakes with Avocado Aioli


They say that the best things in life are free. And in this case, I would have to agree. My mom text me one day letting me know that her co-worker had just got back a from a fishing trip and had freshly caught ahi tuna and was looking for people to take it off of their hands, and she asked me if I would like some. Like, duh! Would I like some fresh, wild-caught, seafood gold? Obvi! So about a week later I was handed a gallon freezer bag full of sushi grade tuna (I think I heard the food angels sing), and I immediately got to work coming up with recipe ideas. First up are these tuna cakes, a fresh take on crab cakes, full of clean and bright flavors, and filling to boot. Plus, these would be super fun to make miniature versions as a party appetizer. Do it, do it! 


Ahi Tuna Cakes with Avocado Aioli

Ingredients:
  • 1 lb. sushi grade ahi tuna, chopped into 1/4-inch pieces
  • 1 tbsp. mayo
  • 2 green onions, greens sliced
  • 1 tbsp. finely chopped red onion
  • 2 garlic cloves, pressed
  • 1 tsp. freshly minced ginger
  • 2 tbsp. freshly chopped cilantro
  • 1-2 tsp. freshly minced jalapeno
  • 1 tsp. sesame oil
  • 1/2 lime, juiced
  • 1 egg
  • 1 tbsp. olive oil
  • 1 large cucumber, peeled and spiralized or sliced thin
Avocado Aioli:
  • 1/2 avocado
  • 1 tbsp. mayo
  • 1/2 lime, juiced
In a medium bowl, mix together the tuna, mayo, onions,  garlic, ginger, cilantro, jalapeno, oil, lime juice, and egg. Form into 4 equal-sized patties, then place into the fridge for 10-20 minutes to set.

Meanwhile, add the avocado, mayo, and lime juice to a food processor and process until thin and creamy. Place into a small ziplock bag and place into the fridge.

Preheat 1 tbsp. olive oil over medium-high heat in a large skillet. Once hot, cook the ahi cakes for 2 minutes on each side, then remove and plate atop the cucumber. Cut a small end off of the ziplock bag with the aioli in it, drizzle with the avocado aioli and serve.

Monday, February 2, 2015

Freezer Friendly Tuna Noodle Casserole


About a month ago I hosted my best friend's baby shower and then blogged about it. Well. said baby is about to be here in the next couple of weeks and I don't want the mommy-to-be and her husband to have to worry about anything other than being amazing parents to baby Kennedy. So, I whipped up a large batch of one of Ashley's favorites, Tuna Noodle Casserole, since she hasn't been able to eat  tuna for the last 9 months, and this freezer friendly meal will have them eating a home-cooked meal without the hassle or mess. You just simply make the casserole, cool it down, and freeze it for your favorite family. All they have to do is thaw it and bake it. I am still trying to wrap my head around the fact that there is going to be a gorgeous little baby in our midst soon, and I couldn't be happier for the parents-to-be!!


Freezer Friendly Tuna Noodle Casserole

Ingredients:
  • 4 tbsp. unsalted butter
  • 3/4 cup finely chopped mushrooms
  • 1/4 cup finely chopped red bell pepper
  • 1/4 cup finely chopped onion
  • 1/4 cup all-purpose flour
  • 2 1/2 cups milk
  • 1 cup grated cheddar
  • 12 oz. water-packed tuna, drained
  • 2 cups egg noodles, cooked
  • 1/4 cup fresh parsley. minced
  • salt and pepper to taste
In a large sauce pan melt the butter over medium heat. Once the butter is melted, add in the mushrooms, bell pepper, and onion. Cook, stirring occasionally for about 5minutes until the veggies are tender. Whisk in the flour and cook for 1 minute. Pour in the milk and continue whisking until the mixture thickens a bit, about 3 minutes.

Remove from the heat and add in the cheddar. Return to heat and stir until the cheese melts into the sauce. Add in the drained tuna, parsley, salt, and pepper, stirring well to combine.

Add in the cooked egg noodles and stir until the noodles are coated in the sauce. Pour tuna noodle casserole into a freezer friendly container and place in the fridge, uncovered for 30 minutes or until cool. Cover and place into the freezer for up to 6 months. 

To cook, simply defrost in the fridge for 24 hours. Preheat oven to 375 degrees F. Bake for 25-35 minutes until golden and bubbly on top. 

Wednesday, November 26, 2014

Cheddar Mashed Potato Waffle Thanksgiving Leftover Sandwiches


This is the Thanksgiving leftover sandwich to end all leftover sandwiches. If there was anything that I was most excited about this holiday season, it was to make Thanksgiving dinner, specifically for the leftovers. And then this sandwich came along. Not only was is absolutely incredible to shoot on my new camera, so much that I might make it my desktop photo on my computer, but it was a thousand more times incredible to eat. Sure you can use your standard bread as the vehicle for your delicious leftovers, but why do that when you can make cheesy waffles out of your mashed potatoes?! Seriously, need I say more?!


Cheddar Mashed Potato Waffle Thanksgiving Leftover Sandwiches

Ingredients:
  • 1 1/2 cups leftover mashed potatoes
  • 1 cup buttermilk or whole milk
  • 2 eggs
  • 2 tbsp. chopped herbs (rosemary, thyme, sage)
  • 1 cup all-purpose flour
  • 1 tsp. baking soda
  • 1/2 tsp. baking powder
  • 1/4 cup freshly grated parmesan
  • 1/4 cup freshly grated white cheddar
  • your Thanksgiving leftovers, reheated if needed
In a large mixing bowl, mix together the mashed potatoes and milk until smooth. Add in the eggs, 1 at a time, mixing well in between additions. Fold in the chopped herbs.

In a medium bowl, whisk together the flour, baking soda, baking powder, and add into the mashed potato mixture. Mix well until combined. Fold in the cheeses and mix well once more.

Preheat your waffle maker and spray with non-stick cooking spray. Cook about 1/4-1/2 cup of batter at a time, depending on how big your waffle maker is, until nice and golden brown.

Place the reheated leftovers between two waffle slices and enjoy.

Tuesday, November 11, 2014

Honey Mustard & Panko Crusted Salmon

I want to take a quick moment this morning to thank all of those men and women, past, present, and future who risk their lives for the better good of our country. A special shout out going to my own little brother. The person that I look up to in so many ways. And not just because you are taller than me. Happy Veteran's Day Stuart! I hope you take advantage of those free meals in Virginia and a big huge virtual hug to you from Arizona!

(Throwback Tuesday? Circa 2010)


26 days until Andrew and I leave for Hawaii, but whose counting? That being said, I have 26 days to log as many miles as I can and be bikini ready for a week of fun in the sun. I'll be thinking about all of you in the colder climates while I sip sneaky tikis on a sunset boat cruise. But one thing I won't do to get bikini ready is to sacrifice flavor while making healthy dinner options. This salmon includes minimal ingredients, but maximizes on flavor. Plus, the panko bread crumbs are an added bonus of crunch, making this one of my favorite salmon recipes to date (always trying to out do myself). 

Honey Mustard & Panko Crusted Salmon

Ingredients:
  • 1 large salmon fillet, or 4 small fillets 
  • 1 1/2 tbsp. dijon mustard
  • 1 1/2 tbsp. honey
  • 1 tsp. pure maple syrup
  • 1 garlic cloves, finely minced
  • 3/4 cup panko bread crumbs
  • 1 tbsp. fresh parsley, chopped

Preheat oven to 400 degrees F.

Line a rimmed baking dish with tin foil and place salmon fillet/s skin side down. Whisk together the mustard, honey, syrup, and garlic in a small bowl. In another small bowl whisk together the panko bread crumbs and the parsley.  Pour the honey mustard evenly over the salmon and the firmly press the panko mixture on top, which will adhere nicely to the honey mustard.

Bake in the oven for about 20 minutes for a single large fillet (9 minutes per 8 oz. of fish), or 10-12 minutes for individual fillets until opaque and flakes easily with a fork. Feel free to cook longer for desired doneness. 

Remove skin after cooking and serve hot. 

Wednesday, October 1, 2014

Chili Garlic Roasted Salmon with Green Bean Salad


I've been moving my way through Seriously Delish from How Sweet It Is, and I can honestly say that every single recipe has been a winner. This salmon is no exception. My realtor/family friend is an avid hunting expeditioner and brought back an insane amount of wild, freshly caught salmon from a recent fishing trip in Alaska and offered us a few filets to cook up at the new house. Can I just tell you what a difference wild salmon is from that farm-raised crap that you buy at the store? I mean, sure, you gotta pick out some bones here and there, but that's how you know it's good! So next time you are trying to justify spending twice the amount of the fresh fish, do yourself a favor and just buy the fish! You'' thank me later! Then drizzle with this perfectly sweet and spicy marinade and serve over a fresh green salad. I took two of her recipes and made them together, since you can't have salmon without salad in my house. Bon Appetit! 

Chili Garlic Roasted Salmon with Green Bean Salad

Ingredients:
  • 1 1/2 lb. salmon fillet
  • 1 1/2 tbsp. olive oil
  • 2 garlic loves, minced
  • 2 tsp. dark brown sugar
  • 1 tsp. crushed red pepper flakes
  • 1/2 tsp. salt
  • 1/4 tsp. freshly ground black pepper
Salad
  • 3 cups fresh spinach leaves
  • 6 oz. fresh green beans, ends trimmed
  • 1 pint cherry tomatoes, halved
  • 1-2 oz. parmigiano-reggiano cheese, shaved for garnish
Preheat 0oven to 400 degrees F.

Line a rimmed baking sheet with tin foil and place the salmon, skin-side down, on the prepared baking sheet. In a small bowl, whisk together the olive oil, garlic, sugar, red pepper, salt, and black pepper. Rub all over the salmon and place int he oven for 20-25 minutes until the salmon flakes easily with a fork.


Meanwhile prepare the salad by tossing the spinach and green beans together, then topping with the tomatoes and shaved cheese. Season with a little bit of salt and pepper or your favorite light flavored dressing. 


Remove skin from salmon and serve over the salad. 

Thursday, September 4, 2014

Miso Honey Glazed Salmon with Cilantro Lime Cucumber


I've been really branching out lately with the flavors that I am using in my kitchen. New house; new attitude I guess. Recent;y I have been trying my hand at adding miso flavors into fish and chicken dishes. So far my favorite things have been a miso ginger salad dressing, and this miso glazed salmon. This was the first dinner that Andrew I cooked in our new home, so it already holds a special place in my heart. The flavors are just light enough to lend themselves without overpowering the fresh salmon, and the tangy cucumber salad adds a cool crunch to the party. 


Cilantro Lime Cucumber

Ingredients:
  • 1 cucumber
  • 1 large garlic clove, minced
  • pinch of red pepper flakes
  • 1/2 jalapeno, minced
  • 1 lime, juiced
  • 2 tbsp. minced cilantro
  • 1 1/2 tbsp. olive oil
  • salt and pepper to taste
Miso Honey Glazed Salmon

Ingredients:
  • 1 tbsp. white miso
  • 1 tsp. sesame oil
  • 1 tsp. soy sauce
  • 2 tbsp. honey
  • 1 1/2 tbsp. rice vinegar
  • 1 garlic clove, minced
  • 1/4 tsp. ground ginger
  • 1 lb. salmon fillet
  • 1 tbsp. olive oil
  • 2 cups cooked white rice

To make the cilantro lime cucumber salad, thinly slice the cucumber lengthwise with a vegetable peeler or mandoline. In a medium bowl, whisk together the garlic, red pepper, jalapeño, lime juice, cilantro, olive oil, salt, and pepper. Add in the cucumber and toss to mix. Place in the fridge until ready to serve.

In a small bowl whisk together the white miso, sesame oil, soy sauce, honey, vinegar, garlic, and ginger. Place the salmon in a large freezer bag and pour the marinade of the salmon. Allow the fish to marinate for at least 30 minutes and up to 2 hours. 

After the salmon has marinated, preheat the olive oil in a large skillet over medium heat. Add the miso honey salmon, skin side down, and cover with a lid. Cook until the salmon is cooked through and flaky when pierced with a fork. 

When ready to serve, place rice on the bottom of the plate, top with the cucumber salad, and finally the cooked salmon.

Wednesday, August 27, 2014

Seared Ahi Tuna with Sesame Noodles


I know on Monday I was all like, "go away summer", but now I'm like, "make all the summery foods"! It's my blog. I'm allowed to change my mind. Right? Today I bring to you a simple seared ahi steak, which might not be the prettiest thing I've ever photographed, but it's sure felt good as I devoured it alongside some creamy udon noodles and spicy cucumber spears. The tuna is just barely warmed through, and the cool noodles and cucumber are the perfect pairings for the end of summer. Today, I'm traveling to some local Sonoita wineries with some of my co-workers to enjoy some wine and cooler weather. It's a tough job, but someones gotta do it. My motto: Love the Wine You're With. 

Seared Ahi Tuna with Sesame Noodles

Ingredients:
  • 1 lb. ahi tuna steak
  • 2 tbsp. sesame seeds
  • 1 tbsp. coconut oil
  • salt & pepper to taste
 Sesame Noodles
  • 1 pkg. pre-packaged/cooked udon noodles
  • 1/2 cup water
  • 2 garlic cloves
  • 1/4 cup chopped fresh ginger
  • 1/4 cup tahini
  • 1.4 cup creamy peanut butter
  • 1/4 cup soy sauce
  • 2 tbsp. honey
  • 2 tbsp. rice vinegar
  • 1 tbsp. sesame oil
  • 1/2 tbsp. sriracha
Heat up the pre-cooked udon noodles in the water for 2-3 minutes, until loosened up. Drain the water and add the noodles to a medium mixing bowl. 

To make the sesame noodles, add the garlic, ginger, tahini, peanut butter, soy sauce, honey, rice vinegar, sesame oil, and sriracha into a food processor and blend until smooth. Pour the dressing over the noodles in the mixing bowl and stir until the noodles are completely covered. Place into the fridge while you cook the tuna.

Pour sesame seeds into a shallow dish large enough to fit the tuna steak. Coat both sides of the tuna in 1/2 tbsp. of oil, salt, and pepper. Press each side of the fish firmly into the sesame seeds. To sear the tuna, heat the remaining coconut oil in a large skillet over medium-high heat and cook for 1 minute on each side. Remove from heat and set on a large cutting board. 

Cut the tuna across the grain diagonally with a very sharp knife and place a few slices on each plate. Serve alongside the sesame noodles, and some spicy cucumbers if you would like for some added texture!

To make spicy cucumbers, cut 1 large cucumber into matchsticks and toss with 2 tsp. soy sauce, red pepper flakes, and salt. Serve cold.

Thursday, July 10, 2014

Fish Taco Bowls with Cauliflower Rice


I need to let you all in on a little secret. Cauliflower rice. It is legit. Seriously. So legit. My boyfriend and I were making dinner for the two of us plus my mom, who doesn't eat rice. So when the idea of a deconstructed fish taco over rice came to mind, I quickly had to come up with a plan B. Cue the cauliflower. It is so simple to make, and actually takes on the consistency of a cous cous/rice hybrid. But way healthier! Top that with some grilled cod and some avocado and we have a little party going on. 


Fish Taco Bowls with Cauliflower Rice
Makes 2 bowls

Ingredients:
  • 1 lb. cod (or other white fish)
  • 1 tsp. chili powder
  • 1 tsp. cumin
  • pinch of garlic powder
  • salt and pepper to taste
  • 2 tbsp. olive oil, divided
  • 1/2 head cauliflower
  • 1/4 red onion, chopped
  • 1/4 cup cilantro, chopped
  • 1/2 red bell pepper, chopped
  • 1/2 cup corn kernels
  • 1/2 cup black beans, drained and rinsed
  • avocado, cilantro, lime juice to garnish
Preheat your grill to high, or heat your oven to 400 degrees F. Meanwhile, season the fish by covering both sides of the cod with 1 tbsp. olive oil, chili powder, cumin, garlic powder, salt and pepper.

Grill fish for about 7-8 minutes on each side. Caution, be careful when flipping, for fish begins to flake easily and can make quite a mess on your grill. If baking, cook in the oven on a baking sheet for 8-10 minutes on each side. Fish is done when it is easily flaked with a fork and more white than glossy in color. 

To make the cauliflower rice, remove the florets from the stem and discard the stems of the cauliflower. Place florets in a food processor and pulse until the cauliflower takes on the appearance of rice granules. Heat the remaining tablespoon of olive oil in a large skillet over medium-high heat. Add in the chopped red onion, bell pepper, and cauliflower "rice". Stir a bit to mix, then cover and let steam for about 8 minutes; stirring occasionally. Remove lid and add in the corn and black beans to heat through; about 2 more minutes.

To serve, place a large spoonful of the cauliflower rice and veggie mixture into a bowl. Top with a few pieces of the grilled cod. Garnish with some chopped avocado, cilantro and a squeeze of lime juice.


Summer is calling!

Monday, July 7, 2014

Flank Steak Tacos with Pineapple Salsa


If you can't tell by my recipes lately, I am obsessed with anything that can be grilled. Today's recipe is no exception. I grilled the flank steak, and then even heated the tortillas up on the grill before serving. Looking back, I kind of wish that I had grilled the pineapple before making the salsa. If you try it, please let me know how it turns out! My weekend was full of 4th of July fun, fireworks, pool, and hot dogs included. Hope you all had a great holiday weekend!


Flank Steak Tacos with Pineapple Salsa

Ingredients:

  • 1/5 lbs. flank steak
  • 1 tbsp. olive oil
  • salt and freshly ground pepper
  • 1/2 tbsp. chili powder
  • 1 lime, juiced
  • 8 small green chile corn tortillas (I got mine at Sprout's, or use your favorite)
Pineapple Salsa
  • 1 small pineapple (about  2lbs). peeled, cored, and diced
  • 1/2 red bell pepper, diced
  • 1/2 cucumber, peeled and diced
  • 1 jalapeno, minced (remove ribs and seeds for less heat)
  • 1/2 small red onion, diced
  • 1/2 cup fresh cilantro, chopped
  • 1 lime, juiced
  • 1 tbsp. olive oil
  • salt and pepper to taste
Prepare the pineapple salsa by combining all of the ingredients in a large bowl, cover, and place in the fridge to allow the flavors to get happy before serving. 

Begin by covering both sides of the steak with the olive oil, salt, pepper, chili powder, and lime juice. Cover and allow to marinate for 30 minutes in the fridge. 

Remove from the fridge and allow it to sit at room temperature while you heat up the grill on high heat.

Cook the flank steak on both sides, until cooked to medium with just a bit of pink inside. This took me about 8-10 minutes. Remove form the grill, turn off heat, and allow the meat to sit for 5 minuted before slicing.

Place the tortillas on the hot grill, browning them a bit on both sides before serving. Slice the steak into thin strips. To serve, place 3-4 slices of the grilled steak in each corn tortilla, top with the pineapple salsa and enjoy!


Wednesday, June 25, 2014

Seven Minute Sweet Heat Salmon


I have recently spent every minute outside of work packing up my life into boxes and slowly moving out of my house that I have inhabited for the past 2 1/2 years. My mattress is currently on the floor. I don't have a dining room, let alone a single chair in sight. And my living room consists of a tv and a couch (too big for me to move while my boyfriend is away on business). This week's dinner theme in my house is what I like to refer to as Rhea vs. The Freezer. I've been known to find great deals at my local grocer, and then save them in the freezer for future consumption. Well, future consumption is now, and the results were delicious! This salmon is absolutely effortless, but in no way skimps on flavor! In just 7 minutes you can have an incredible dinner on the table.


Seven Minute Sweet Heat Salmon

Ingredients:
  • 1 boneless salmon filet, skin on
  • 1 tsp. sweet & spicy seasoning mix (recipe below)
  • 1/2 tbsp. olive oil
Prepare salmon by sprinkling the sweet and spicy seasoning all over the top (pink side). In a medium skillet, heat olive oil over medium-high heat. Add salmon filet to hot oil, pink side down. Cook for 4 minutes, then flip over to the skin side and cook for another 2 minutes, for medium. Salmon should flake with a fork . If you would like your salmon well done, simply add another 1-2 minutes cook time on each side.

Serve with your favorite side dish and squeeze some fresh lemon juice over the top just before serving.


To make your own sweet & spicy seasoning, mix together the following:
  • 1 tbsp. brown sugar
  • 1 tsp. paprika
  • 1/2 tsp. chili powder
  • 1/4 tsp. onion powder
  • 1/4 tsp. garlic powder
  • pinch of salt and pepper 

Friday, April 18, 2014

Teriyaki Ginger Salmon


This week has been and is going to be full of social activities for me. I had the major pleasure of catching Lana Del Rey in concert and my mind was officially blown. She was absolutely flawless in my mind, and put on a great show (though I wished that it had been more than an hour). If you ever have the chance to check out a one of a kind artist like her, you won't regret it. Then I attended the Bloguettes Launch Party with some other fellow bloggers (and childhood friends!), which was a blast. You can check out their blogs here and here. And finally, this weekend I am heading to Las Vegas for a bachelorette party. It seems I may have successfully crammed 3 different social groups into one week, and I am loving it!

This is my final recipe to my Easter line-up this week. I know a lot of people have their traditions, and some of those include serving fish. I didn't forget about you guys! This dish has an amazing balance between simple and clean, but also a great depth of flavor and just the right kick of ginger. I know this is going to be on regular rotation in my house this summer. 

Teriyaki Ginger Salmon

Ingredients:
  • 1 lb. salmon, with skin on
  • 1 cup teriyaki sauce
  • 1 tsp. freshly minced ginger
  • 2 garlic cloves, minced
  • 3 tbsp. dark brown sugar
  • 2 tbsp. honey
  • 1/4 cup olive oil
Stir Fry
  • 1 cup quinoa, rinsed and drained
  • 1/2 tsp. garlic salt
  • 2 cups water
  • 1 tbsp. olive oil
  • 2 bell peppers, color of your choice, thinly sliced
  • 2 garlic cloves, minced
  • 1 tsp. freshly minced ginger
  • 1 cup snow peas
  • salt and pepper to taste
  • pinch of red pepper flakes
In a large zip lock bag, add the teriyaki sauce, ginger, garlic, brown sugar, honey, and olive oil. Mix together and then add the salmon into the bag. Release as much air as you can and seal the bag. Allow the salmon to marinate for 1 hour in the fridge.

Preheat the oven to 400 degrees F. Add some tinfoil to a baking sheet and place the salmon skin side down on the foil. Bake for 18 minutes until the salmon flakes easily with a fork.

Meanwhile, add the quinoa, garlic salt, and water to a medium pot. Cover and bring to a boil. Lower heat to simmer and cook for about 15 minutes, until the liquid has been absorbed and the quinoa is fluffy like rice. Set aside.

In a large saute pan, heat the olive oil over medium heat. Add the garlic and ginger and cook for 1 minute until fragrant. Now add the sliced bell peppers, cooking for another 2 minutes. Lastly, add the snap peas and allow them to warm slightly. Toss the vegetables, salt, pepper, and red pepper flakes into the cooked quinoa and stir to mix.

Split the quinoa between 4 different plates and top with the cooked salmon. Serve hot.


design + created by strawberriesnwine.com | 2014